
If you’re dealing with water intrusion in your basement, understanding the proper techniques for injection waterproofing is crucial. You’ll need to identify cracks, gather the right tools, and select effective materials for sealing. This process not only protects your space but also prevents future damage. Before you start, it’s important to prepare your basement correctly. Let’s explore the steps to guarantee a successful waterproofing project.
Key Takeaways
- Inspect the basement for cracks, damp spots, and mold to identify areas needing waterproofing before starting the injection process.
- Gather essential tools and materials, including a caulking gun, injection ports, polyurethane foam, and safety gear for effective application.
- Clear the work area of furniture and debris, ensuring a clean surface for better adhesion of waterproofing materials.
- Choose between polyurethane foam for filling gaps and epoxy resin for structural repairs based on your specific basement conditions.
- Conduct a thorough post-injection inspection to verify effectiveness and monitor for any signs of water seepage regularly.
Understanding Basement Water Intrusion
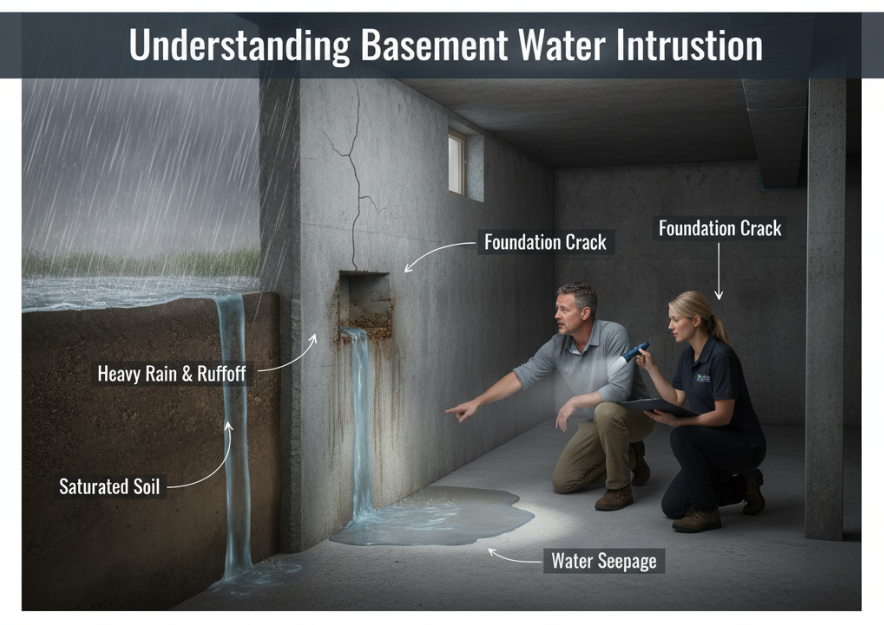
How can you effectively identify the sources of water intrusion in your basement?
Start by inspecting your home’s exterior for cracks in the foundation, gaps around windows, and poor drainage systems. Pay attention to nearby trees and shrubs that may divert water towards your foundation.
Inside, check for damp spots, mold growth, and musty odors, which indicate hidden water sources. Use a moisture meter for accurate readings.
Implement prevention strategies like sealing cracks, improving drainage, and ensuring gutters are clear.
Tools and Materials Needed for Injection Waterproofing
To successfully tackle injection waterproofing, you’ll need a specific set of tools and materials that guarantee effective sealing and moisture prevention. Here’s a concise tools checklist along with material requirements to get you started:
| Tools | Materials |
|---|---|
| Caulking gun | Polyurethane foam |
| Injection ports | Epoxy resin |
| Drill and bits | Hydraulic cement |
| Trowel | Injection sealant |
| Safety goggles and gloves | Water-resistant barrier |
Gathering these essentials confirms you’re prepared for the task, allowing for efficient application and long-lasting results in your basement waterproofing efforts.
Preparing Your Basement for Waterproofing
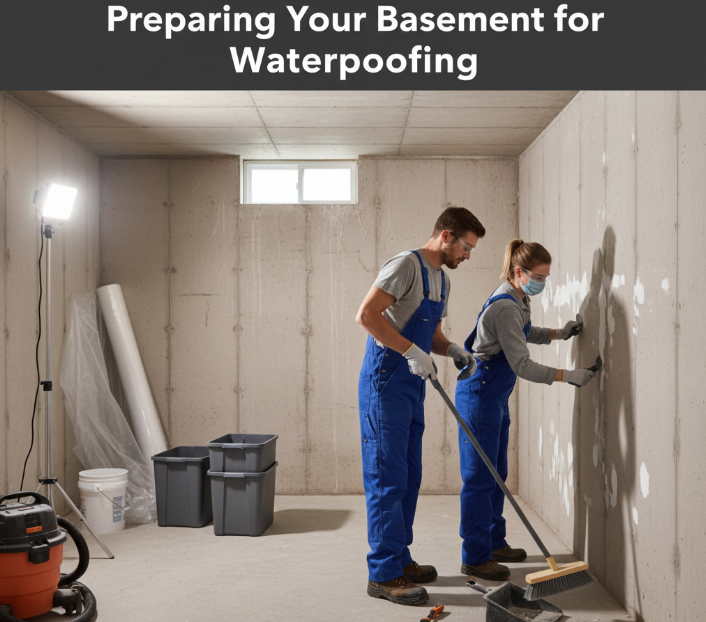
Before you start waterproofing, you need to assess any existing water damage in your basement.
Look for signs like mold, peeling paint, or dampness that could indicate serious issues.
Once you’ve identified problem areas, clear out any obstructions to guarantee a clean workspace for your waterproofing efforts.
Assess Water Damage
Evaluating water damage in your basement is essential for effective waterproofing. Inspect for visible signs like mold, peeling paint, or damp spots, as these indicate moisture intrusion. Use the following table to assess the severity of the damage:
| Damage Type | Severity Level |
|---|---|
| Minor Dampness | Treat with moisture barriers |
| Moderate Mold | Requires drainage solutions |
| Severe Structural | Consult a professional |
Addressing these issues promptly will enhance your waterproofing efforts. Implementing proper drainage solutions and moisture barriers can prevent future damage and maintain a dry, healthy basement.
Clear Obstructions Thoroughly
Clearing obstructions thoroughly is essential for effective basement waterproofing. Start with obstruction removal by identifying and eliminating any items blocking access to walls and floors. This includes furniture, boxes, and debris.
Use cleaning techniques like vacuuming or sweeping to guarantee surfaces are free of dust and dirt, which can hinder the application of waterproofing materials. Pay special attention to corners and behind appliances, where moisture can accumulate.
Once the area is clean and clear, you’ll improve the adhesion of waterproofing solutions, ensuring a more effective barrier against future water intrusion. A well-prepped basement enhances your waterproofing efforts considerably.
Identifying Cracks and Leaks
As you begin the journey of DIY basement waterproofing, identifying cracks and leaks is essential for ensuring a dry, protected space.
Start with thorough crack detection by inspecting walls and floors for visible fissures. Perform a leak assessment during heavy rain or after prolonged wet weather to spot potential problem areas.
- Check for damp spots or mold growth.
- Look for water stains along walls and floors.
- Use a moisture meter for precise readings.
Choosing the Right Injection Material
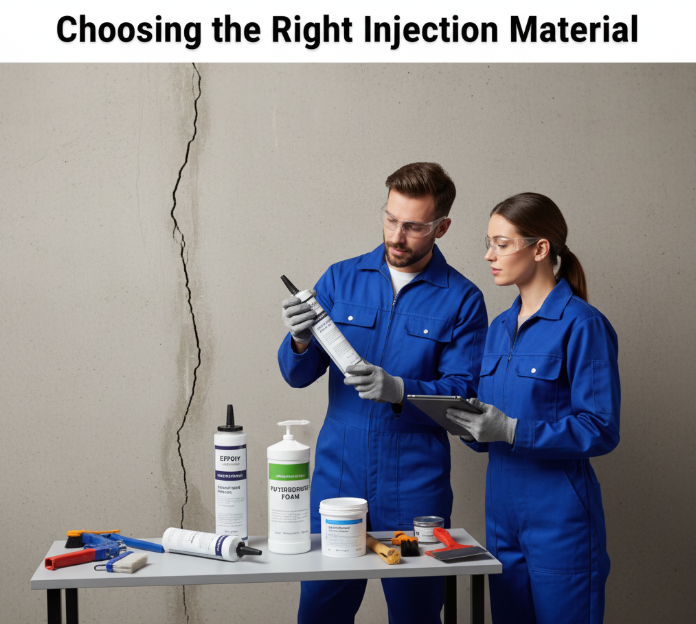
When it comes to selecting the right injection material for your basement waterproofing project, you need to understand the different types available.
Each material has unique properties that affect its performance and suitability for various applications, so comparing them is essential.
Types of Injection Materials
Choosing the right injection material for basement waterproofing is essential to guarantee effective and lasting results.
You’ll typically consider two main options—polyurethane foam and epoxy resin. Each has unique qualities that make them suitable for specific situations.
- Polyurethane Foam: Expands upon application, filling gaps effectively.
- Epoxy Resin: Offers strong adhesion and is ideal for structural repairs.
- Cost and Application: Weigh the costs and ease of application for your project.
Material Properties Comparison
Understanding the properties of different injection materials is essential for making an informed decision about your basement waterproofing project.
Polyurethane polymers are flexible and excellent for filling voids, while epoxy offers unmatched adhesion and durability.
The polymer properties allow for movement in the foundation, reducing the risk of cracking, whereas epoxy advantages lie in its resistance to water pressure and chemical exposure.
Choosing between these materials depends on your specific needs; if flexibility is vital, opt for polyurethane.
However, if you need a strong, permanent seal, epoxy is the better choice.
Assess your basement’s conditions to select the ideal material.
Application Suitability Criteria
While evaluating your basement waterproofing needs, consider the specific conditions of your environment and the characteristics of the injection materials. Your choice should align with site-specific factors that influence application performance.
- Assess the water pressure surrounding your basement.
- Determine the type of cracks present—hairline or larger.
- Evaluate the temperature fluctuations in your area.
Selecting the right injection material guarantees effective sealing and long-lasting results. Understanding these criteria will help you make informed decisions, ultimately enhancing your basement’s protection against water intrusion and related issues.
Step-by-Step Injection Process
To effectively seal cracks and prevent water intrusion, follow this step-by-step injection process.
First, clean the crack thoroughly to remove debris.
Next, choose the appropriate material selection based on the crack size; polyurethane foam works well for small cracks, while epoxy is better for larger ones.
Using a caulking gun, apply the chosen injection material into the crack, guaranteeing it fills completely.
Employ injection techniques such as pressure injection for deeper cracks.
Allow the material to cure as per manufacturer instructions.
Finally, check for any signs of leakage after curing to guarantee a successful waterproofing job.
Post-Injection Inspection and Maintenance
Once the injection material has cured, it’s vital to conduct a thorough post-injection inspection to confirm the effectiveness of your waterproofing efforts.
This step is essential for verifying that the injection was successful and identifying any areas needing further attention.
Implement a maintenance schedule for regular checks to guarantee long-lasting protection.
- Check for any visible cracks or moisture.
- Monitor the injected areas regularly for signs of water seepage.
- Document findings to track the effectiveness of your waterproofing and adjust your post injection monitoring as needed.
Stay proactive to maintain a dry and safe basement environment.
Additional Waterproofing Measures
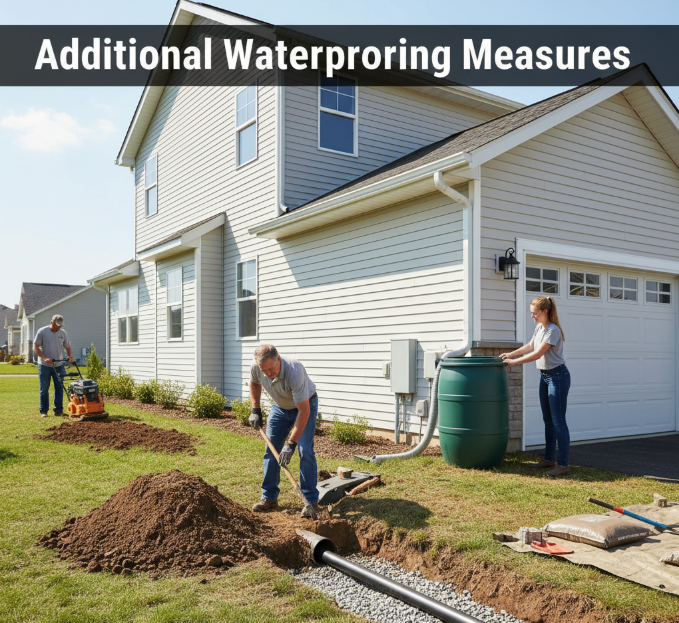
After confirming that your initial waterproofing efforts are sound, it’s essential to explore additional waterproofing measures to bolster your basement’s defenses against moisture. Implementing effective drainage solutions and humidity control techniques can greatly enhance your protection. Consider the following options:
| Measure | Description |
|---|---|
| Sump Pump Installation | Removes accumulated water efficiently |
| French Drains | Redirects water away from the foundation |
| Dehumidifiers | Reduces indoor humidity levels |
| Sealants | Provides an extra layer of protection |
| Proper Grading | Guarantees water flows away from the home |
These strategies combined will create a robust defense against moisture.
When to Seek Professional Help
How can you determine when it’s time to call in a professional for your basement waterproofing needs? If you’re facing persistent water issues, it’s vital to evaluate a professional assessment.
Here are some signs it’s time to seek expert help:
- You’ve noticed cracks in walls or foundation that could indicate structural concerns.
- Water intrusion continues despite DIY efforts, suggesting deeper issues.
- You’re unsure how to proceed with complex repairs or prevention techniques.
In these situations, professionals possess the expertise to diagnose problems accurately, implement effective solutions, and guarantee your basement remains dry and structurally sound.
Don’t hesitate to reach out!
Conclusion
By taking the reins of your basement waterproofing project, you’re not just sealing cracks; you’re fortifying your sanctuary against the relentless forces of nature, much like ancient fortresses withstood sieges. With the right tools and techniques, you can achieve a dry, safe environment. Remember to monitor your repairs regularly, as even the mightiest walls need upkeep. Should your efforts fall short, don’t hesitate to call in the professionals, for even the best knights sometimes require reinforcements.